In this article, we’ll show how to enable DNS logging for all user queries on a DNS server running Windows Server, how to parse and analyze DNS logs. I faced this task when I had to decommission an old Active Directory domain controller in a branch office and I needed to understand which devices were still using the DNS server. After enabling a DNS log and analyzing it, I was able to find the devices and reconfigure them to use other DNS servers. Also, this method will help you to find hosts with suspicious activity in your Active Directory network (accessing malicious URLs, botnet hosts, etc.).
By default, the DNS logging is disabled on Windows Server. To enable it:
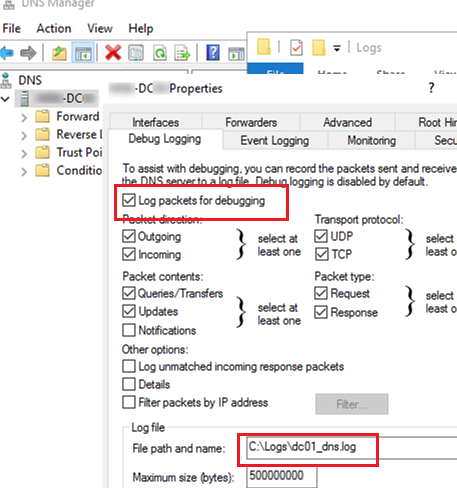
- Open the DNS Manager snap-in (
dnsmgmt.msc) and connect to the DNS server you want; - Open its properties and go to the Debug Logging tab;
- Enable the Log packets for debugging option;
- Then you can configure the logging options: select DNS packet direction, a protocol (UDP and/or TCP), packet types (simple DNS queries, updates, or notifications);
- Using the Filter packets by IP address option, you can specify the IP addresses to log incoming or outgoing packets for (it allows to significantly reduce the log size);
- In the Log file path and name box, specify the name of the text file you want to log all events to. By default, the size of the DNS log is limited to 500MB. After it is reached, old DNS lookup events will be overwritten with the new ones.
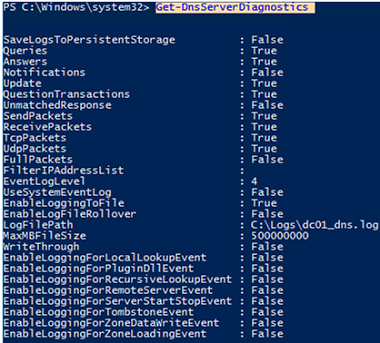
Also, you can enable DNS query logging or get current settings using PowerShell:
Get-DnsServerDiagnostics
Then run a DNS query against your server from any computer. For example, if the IP address of our DNS host running Windows Server is 192.168.13.10:
nslookup woshub.com 192.168.13.10
Resolve-DnsName -Name woshub.com -Server 192.168.13.10
A DNS lookup query returned the client IP address of the requested host.
Let’s make sure that the query has appeared in the DNS server log.
To do it, search the text log file by the client IP address (192.168.13.130). You can open the log file in the NotePad or grep it using PowerShell:
get-content "C:\Logs\dc01dns.log" | Out-String -Stream | Select-String "192.168.13.130"
Here is the event example:
11/17/2021 6:00:00 AM 0D0C PACKET 00000272D98DD0B0 UDP Rcv 192.168.13.130 0002 Q [0001 D NOERROR] A (8)woshub(2)com(0)
As you can see, a DNS query to resolve a name (8)woshub(2)com(0) was received (rcv) from the client 192.168.13.130 over UDP, then the DNS server successfully (NOERROR) responded to it (snd).
Field # Information Values
------- ----------- ------
1 Date
2 Time
3 Thread ID
4 Context
5 Internal packet identifier
6 UDP/TCP indicator
7 Send/Receive indicator
8 Remote IP
9 Xid (hex)
10 Query/Response R = Response
blank = Query
11 Opcode Q = Standard Query
N = Notify
U = Update
? = Unknown
12 Flags (hex)
13 Flags (char codes) A = Authoritative Answer
T = Truncated Response
D = Recursion Desired
R = Recursion Available
14 ResponseCode
15 Question Type
16 Question Name
Due to a specific format, it is hard to manually parse and analyze such a DNS log file. So you need to convert the DNS query log to a more convenient format, using the Get-DNSDebugLog.ps1 script.
Download the file to your disk. Then allow the PowerShell scripts to execute in the current console session:
Set-ExecutionPolicy -Scope Process Unrestricted
Import the function from Get-DNSDebugLog.ps1 to your session:
. C:\ps\Get-DNSDebugLog.ps1
Then transform the DNS log into a more convenient format:
Get-DNSDebugLog -DNSLog C:\Logs\dc01dns.log | format-table
Or you can export the result to a CSV file for further analysis in Excel (or you can access an Excel file directly from PowerShell and write the DNS queries you want to it).
Get-DNSDebugLog -DNSLog C:\Logs\dc01dns.log | Export-Csv C:\log\ProperlyFormatedDNSLog.csv –NoTypeInformation
You can export the file to Excel and use it to analyze DNS queries (the file contains host IP addresses and DNS names they requested from your DNS server).
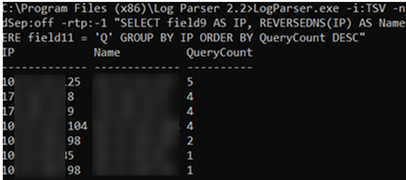
Also, you can use Log Parser 2.2 (https://docs.microsoft.com/en-us/archive/blogs/secadv/parsing-dns-server-log-to-track-active-clients) to parse and analyze the DNS log file. For example, the command below will display the number of DNS queries from each IP address:
LogParser.exe -i:TSV -nskiplines:30 -headerRow:off -iSeparator:space -nSep:1 -fixedSep:off -rtp:-1 "SELECT field9 AS IP, REVERSEDNS(IP) AS Name, count(IP) as QueryCount FROM "C:\Logs\dc01dns.log" WHERE field11 = 'Q' GROUP BY IP ORDER BY QueryCount DESC"
In this example, we used text files to collect DNS logs. In Windows Server 2012 and newer you can log DNS queries directly to the Event Viewer(Microsoft-Windows-DNS-Server/Audit). But in my opinion, text DNS logs are much easier to analyze.
After enabling the DNS query log and analyzing it, I found the IP addresses of devices that were still using the DNS server and reconfigured them to other DNS servers. If the old DC doesn’t contain any FSMO roles, you can remove it (AD user logon events don’t matter here).


1 comment
I’m trying the script you kindly provided, but it is not producing datetime values in the output and I am not sure my skills are up to finding out why. I did test the date and time regex in the script against a line of my log file and the match is working, so that should be returning the date and time to the subsequent object, but it doesn’t appear to be liking the expression there for some reason.
Ah, the issue is with the datetime parsing in the $returnselect expression. The example in the script uses a log entry using a 24 hour clock, but my log file uses 12 hour and am/pm. Those were not taken into account, so the snippet @{label=”DateTime”;expression={[datetime]::ParseExact($match.Groups[‘log_date’].value.trim(),”dd/MM/yyyy HH:mm:ss”,$null)}} must instead be @{label=”DateTime”;expression={[datetime]::ParseExact($match.Groups[‘log_date’].value.trim(),”dd/MM/yyyy h:mm:ss tt”,$null)}}.
Note the change from “HH:mm:ss” to “h:mm:ss tt”. I am not clever enough to update the script to take these potential differences in log format into account, but I can at least edit it to make it work. Thank you for this very useful entry!