Every experienced Windows administrator has faced some issues with the WMI service (Windows Management Instrumentation) and its components. The problems in WMI subsystem are critical for the normal operation of Windows, therefore the administrator needs to check and restore the functionality of WMI as soon as possible. In this article we’ll describe quite a simple technique of troubleshooting and fixing WMI problems on Windows 10 and Windows Server 2016/2019.
A problem with the WMI may indicate a wide range of errors:
- The errors on the WMI queries processing in the system and application logs (
0x80041002 - WBEM_E_NOT_FOUND,WMI: Not Found,0x80041010 WBEM_E_INVALID_CLASS); - GPO processing errors related with WMI (incorrect work of the WMI-filters of Group Policies, etc.);
- WMI queries are very slow;
- Errors during installation or operation of SCCM/SCOM agents;
- Errors in scripts (VBS or PowerShell) that use the WMI namespace (scripts with Get-WmiObject, etc.)
Troubleshooting WMI Problems
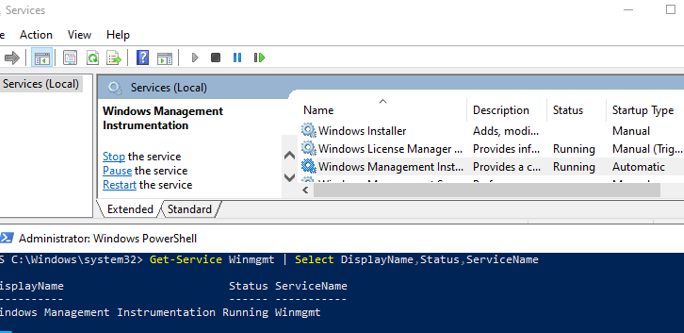
The first step is to check the Windows Management Instrumentation (Winmgmt) service is installed on Windows and running. You can check the status of the service in the services.msc console or using PowerShell:
Get-Service Winmgmt | Select DisplayName,Status,ServiceName
If the Winmgmt service is running, you can test the health of WMI by quering it with a simple WMI command. You can execute wmi request from command prompt or from PowerShell. For example, the following command will list the programs installed on Windows:
wmic product get name,version
The simplest PowerShell command to get information about the version and build of Windows 10 via WMI might look like this:
get-wmiobject Win32_OperatingSystem
As you can see, the WMI service responded to the request correctly. If Windows returns an error when executing such a WMI query, most likely the WMI service is not working correctly, the WMI repository is damaged, or there are other problems.
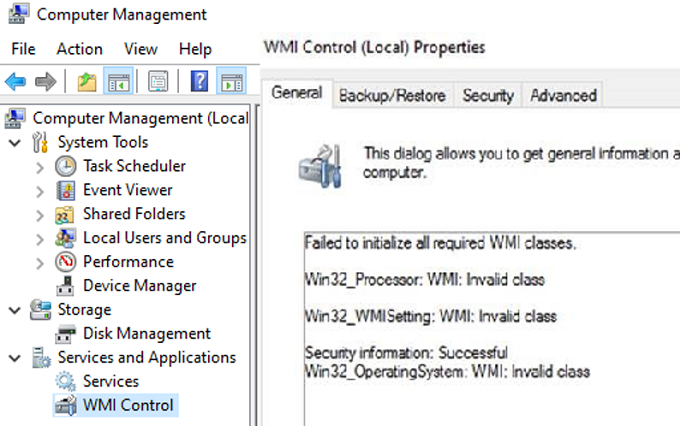
In my case, for example, when opening the WMI Control properties in the Computer Management snap-in (compmgmt.msc), the following message appeared:
Failed to initialize all required WMI classes
Win32_Processor. WMI: Invalid namespace
Win32_WMISetting. WMI: Invalid namespace
Win32_OperationSystem. WMI: Invalid namespace
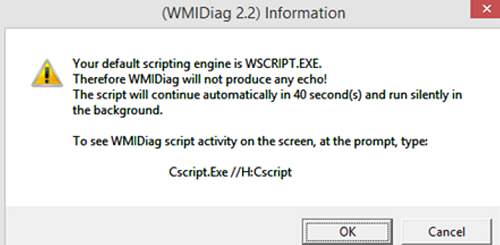
Previously, the official Microsoft tool WMIDiag.vbs (Microsoft WMI Diagnosis) was used to diagnose WMI. WMIdiag is a vbs script that checks various WMI subsystems and writes the collected information to the log files (by default the logs are located in %TEMP% folder – C:\USERS\%USERNAME%\APPDATA\LOCAL\TEMP\). The resulting report consists of files with names starting with WMIDIAG-V2.2 and includes the following file types:
- LOG files contain a detailed report report on the activity and operation of the WMIDiag tool;
- TXT files contain the summary reports of found errors that are worth paying attention;
- CSV files contain information necessary for a long-term analysis of the WMI performance.
c:\windows\System32\cscript.exe wmidiag.vbsotherwise, there occurs an error:
WMIDiag must be run from native 64-bit environment. It is not supported in Wow64.
After WMIDiag has completed its task, the administrator should examine the log files, analyse and try to fix the found errors.
Unfortunately, the latest version of WMIDiag 2.2 works correctly only with versions up to Windows 8.1/Windows Server 2012 R2. At this point, Microsoft has even removed the link to download WMIDiag from the Download Center. But if you wish, this script can be found on the web.
WMIDiag provide detailed information on how to correct local errors in WMI, but in most cases it is a time-consuming task and is worth of the time spent only when looking for solutions to the problems in the critical systems (usually on the production servers). In case of the user workstations, it is much easier to reset and rebuild the WMI repository in Windows.
Repairing the WMI Repository and Recompiling MOF Files
On Windows 10/Windows Server 2016, you can check the integrity of the WMI repository using the command:
winmgmt /verifyrepository
If the command returns that the WMI database is in an inconsistent state (INCONSISTENT or WMI repository verification failed), you should try doing a soft fix of WMI repository errors:
Winmgmt /salvagerepository
WMI repository has been salvaged.
This command checks the consistency of the WMI repository and rebuilds the WMI database if inconsistencies are found.
Restart the WMI service:
net stop Winmgmt
 net start Winmgmt
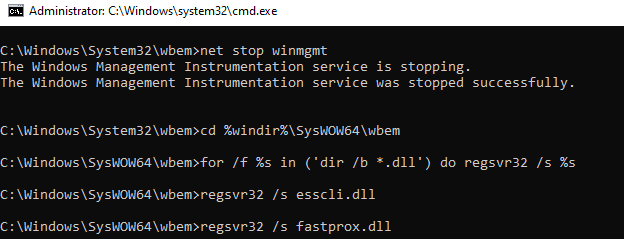
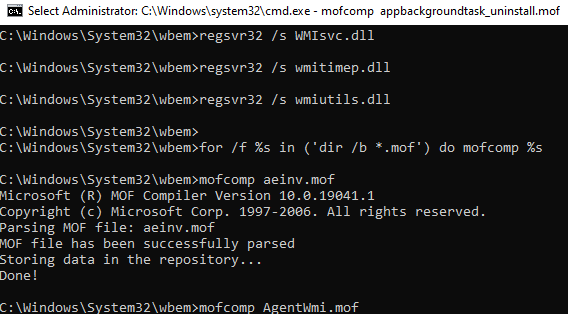
If the standard WMI fix doesn’t work, try the following script. This script is a “soft” option for recovering the WMI service on the computer (the DLL libraries and WMI are re-registered and MOF files are recompiled). This procedure is safe and its implementation should not cause any more problems with the operating system:
sc config winmgmt start= disabled
 net stop winmgmt
 cd %windir%\system32\wbem
 for /f %s in ('dir /b *.dll') do regsvr32 /s %s
 wmiprvse /regserver
 sc config winmgmt start= auto
 net start winmgmt
 for /f %s in ('dir /b *.mof') do mofcomp %s
 for /f %s in ('dir /b *.mfl') do mofcomp %s
cd %windir%\SysWOW64\wbem
These commands can be run by simply pasting them into the command prompt, or you can save the script as a BAT file (wmi_soft_repair.bat) and run it with the administrator permissions. After the script finishes, restart Windows and check if WMI is working.
Rebuilding the WMI Repository
If the method described above has not helped, use more “hard” way of the WMI recovery that implies the recreation of the WMI repository.
%windir%\System32\Wbem\Repository and is a database that contains information on the metadata and definitions of the WMI classes. In some cases the WMI repository can also contain static class information. When the repository is damaged, errors occur in the activity of WMI service (Winmgmt).If you suspect that the WMI repository is damaged, keep in mind that it only should be recreated if no other means to restore WMI are effective.
The following command will reset the WMI database to its original state (as after a clean Windows install). Use this command to hard reset the WMI repository if the salvagerepository parameter didn’t fix the problem:
Winmgmt /resetrepository
If both commands (Winmgmt /salvagerepository and Winmgmt /resetrepository) didn’t restore the consistent state of the WMI database, try to perform a hard reset of the WMI database with the following script:
sc config winmgmt start= disabled
 sc config winmgmt start= disabled
 net stop winmgmt
 cd %windir%\system32\wbem
 winmgmt /resetrepository
 winmgmt /resyncperf
 if exist Repos_bakup rd Repos_bakup /s /q
 rename Repository Repos_bakup
 regsvr32 /s %systemroot%\system32\scecli.dll
 regsvr32 /s %systemroot%\system32\userenv.dll
 for /f %s in ('dir /b *.dll') do regsvr32 /s %s
 for /f %s in ('dir /b *.mof') do mofcomp %s
 for /f %s in ('dir /b *.mfl') do mofcomp %s
 sc config winmgmt start= auto
 net start winmgmt
 wmiprvse /regserver
This script completely removes and recreates the WMI repository folder (the old repository is saved to the Repos_backup directory). After the script has completed, you need to restart Windows. Then check the WMI service with a simple query.
Check the WMI repository state. If the errors are fixed, the winmgmt /verifyrepository command should return:
WMI repository is consistent
In this article, we have showed basic ways to diagnose and troubleshoot the WMI service and repository.



2 comments
Great article, you made my day!
I got the WMI corrupted on my dell laptop, after an update which ended with a BSOD… after many attempts, your “soft” recovery procedure worked in my case.
I believe nowadays everybody has a 64 bits OS, so it’s very important to run the whole batch twice as you wrote, one on “%windir%\system32\wbem” and again on “%windir%\SysWOW64\wbem”.
One quick note: if you save as .bat file, all the “%s” should become “%%s” otherwise the CMD will throw an error.
A virtual beer for you!
My issue was MSINFO32 .. displayed error: “cannot access the windows management instrumentation software”
As per the previous comment, running the Soft recovery for both 32-bit and in sysWOW64 resolved the issue for me.
Laptop = Dell Precision running Windows 10 Pro 22H2
Thanks a lot!