In the last article we told about a new technology of the distributed storage that appeared in Windows Server 2016 – Storage Spaces Direct (S2D). S2D allows to create a network failover distributed virtual data storage on the local disks of cluster servers (see the article). In this article, we’ll show you how to detect and replace a failed physical disk in an S2D cluster.
I remind you that in S2D you can create a Mirror type storage (similar to RAID 1): in a 2-disk configuration (not recommended), this storage can survive a failure of any disk, and if there are 3 or more disks in a pool, 2 disks may fail without any consequences. The second type of the array is Parity (similar to RAID 5). In the configuration consisting of three disks, an array can lose one disk without any consequences, if there are seven disks, 2 of them may fail at a time.
You can check the status of the storage subsystem of an S2D cluster using this command:
Get-StorageSubSystem *Cluster* | Get-StorageJob
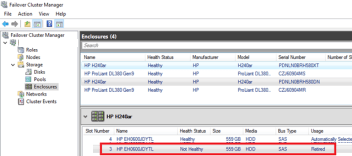
You can find a fault with one of the disks in a storage pool using the GUI in the Failover Cluster Manager (Storage ->Storage Pool). As you can see, one of the physical disks in the pool is in the Unhealthy state.
You can get the information about the status of the disks in a pool using PowerShell:
Get-StoragePool *S2D* | Get-PhysicalDisk
Save the object of the problem disk into a variable, for example, like this:
$Disk = Get-PhysicalDisk |? OperationalStatus -Notlike ok
Prevent further write attempts to this disk:
Set-PhysicalDisk -InputObject $Disk -Usage Retired
Try to remove the failed disk from the storage pool:
Get-StoragePool *S2D* | Remove-PhysicalDisk –PhysicalDisk $Disk
Soon a warning will appear that this device doesn’t respond.
To make it easier to identify a disk in a server rack, enable LED light of a disk:
Get-PhysicalDisk |? OperationalStatus -Notlike OK | Enable-PhysicalDiskIdentification
Now go to the server room and find a problem disk using the backlight enabled earlier.
Replace a failed disk with a new one.
You can now turn off the backlight:
Get-PhysicalDisk |? OperationalStatus -like OK | Disable-PhysicalDiskIdentification
Make sure that the OS has detected the new disk:
$Disk = Get-PhysicalDisk | ? CanPool –eq True
Add the new disk to a pool:
Get-StoragePool *S2D* | Add-PhysicalDisk –PhysicalDisks $Disk –Verbose
This is all, S2D will automatically start the data redistribution between the disks in a cluster (in Windows Server 2012 Storage Spaces, you had to run the command Repair-VirtualDisk manually). The synchronization time depends on the disk capacity and the pool load (it took about 30 minutes in my test stand). After that you can check the pool status again.


1 comment
I have a 2 node s2d cluster with 2 NVME cache disks and 28 3TB SAS HDDs per node. I have added 4 2.4TB NVME SSDs to each node that I would like to add as a performance tier. I have set the nodes not to automaticlly add new disks to prevent these from being added as cache drives. How can I add these drives as part of the performance tier and not as cache disks? Thanks