A script or an executable with a digital signature allows a user to make sure that a file is original and its code has not been changed by third parties. Current versions of PowerShell have built-in tools for code signing of *.ps1 script files using digital certificates.
You can sign a PowerShell script using a special type of certificate – Code Signing. This certificate can be obtained from an external commercial certification authority (AC), an internal enterprise CA or you can use a self-signed certificate.
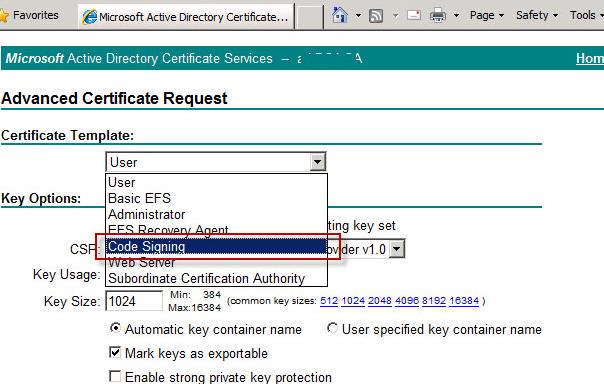
Suppose, PKI services (Active Directory Certificate Services) are deployed in your domain. Let’s request a new certificate by going to https://CA-server-name/certsrv and requesting a new certificate with the Code Signing template (this template must first be enabled in Certification Authority console).
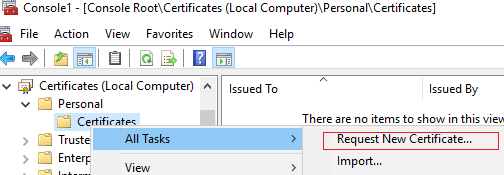
Also, the user can request a certificate for signing PowerShell scripts from the mmc snap-in Certificates -> My Account -> Personal -> All Tasks -> Request a new certificate.
If you manually requested a certificate, you should have an x509 certificate file with a .cer extension. This certificate must be installed in the local certificate store of your computer.
You can use the following PowerShell commands to add the certificate to the trusted root certificates of the computer:
$certFile = Export-Certificate -Cert $cert -FilePath C:\ps\certname.cer
 Import-Certificate -CertStoreLocation Cert:\LocalMachine\AuthRoot -FilePath $certFile.FullName
If you want to use a self-signed certificate, use the New-SelfSignedCertificate cmdlet to create a CodeSigning certificate with the DNS name testPC1:
New-SelfSignedCertificate -DnsName testPC1 -Type CodeSigning
 $cert = New-SelfSignedCertificate -Subject "Cert for Code Signing” -Type CodeSigningCert -DnsName test1 -CertStoreLocation cert:\LocalMachine\My
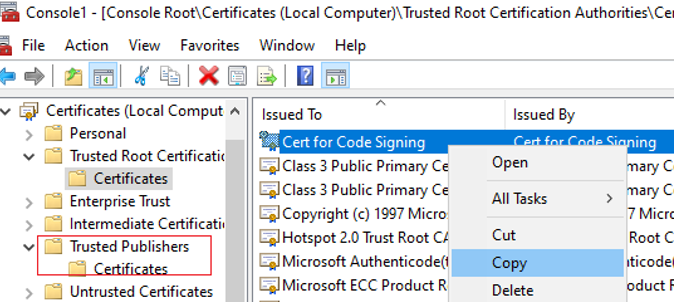
After the certificate has been generated, move it from Intermediate container to Trusted Root using Certificate Manager console (certmgr.msc).
After you got the certificate, you can configure the PowerShell Script Execution Policy to allow only signed scripts to run. By default, the PowerShell Execution Policy on Windows 10/ Windows Server 2016 is set to Restricted (blocks execution of any PowerShell scripts).
File C:\ps\script.ps1 cannot be loaded because running scripts is disabled on this system.
To allow only signed PS1 scripts to run, you can change the PowerShell Eecution Policy to AllSigned or RemoteSigned (with the only difference that RemoteSigned requires a signature only for the scripts downloaded from the Internet):
Set-ExecutionPolicy AllSigned –Force
In this mode, when running unsigned PowerShell scripts, an error appears:
File C:\script.ps1 cannot be loaded. The file script.ps1 is not digitally signed. You cannot run this script on the current system.
Now let’s move on to signing the PowerShell script file. First of all, you need to get the CodeSign certificate from the current user’s local certificate store. First, let’s list all the certificates that can be used to sign code:
Get-ChildItem cert:\CurrentUser\my –CodeSigningCert
In our case, we will take the first certificate from personal user cert store and save it in the $cert variable:
$cert = (Get-ChildItem cert:\CurrentUser\my –CodeSigningCert)[0]
If you have moved your certificate to the trusted root certificate store, use the following command:
$cert = (Get-ChildItem Cert:\LocalMachine\AuthRoot –CodeSigningCert)[0]
You can then use this certificate to sign the PS1 file with your PowerShell script:
Set-AuthenticodeSignature -Certificate $cert -FilePath C:\PS\testscript.ps1
You can also use the following command (in this case, we select the self-signed certificate created earlier by DnsName):
Set-AuthenticodeSignature C:\PS\test_script.ps1 @(gci Cert:\LocalMachine\AuthRoot -DnsName testPC1 -codesigning)[0]
-TimestampServer "http://timestamp.verisign.com/scripts/timstamp.dll"If you try to use a common SSL/TLS certificate to sign the script, an error appears:
Set-AuthenticodeSignature: Cannot sign code. The specified certificate is not suitable for code signing.
You can sign all PowerShell script files at once in the folder:
Get-ChildItem c:\ps\*.ps1| Set-AuthenticodeSignature -Certificate $Cert
Now you can check that the PowerShell script file is signed properly. You can use the Get-AuthenticodeSignature cmdlet or open the PS1 file properties and go to the Digital Signatures tab.
Get-AuthenticodeSignature c:\ps\test_script.ps1 | ft -AutoSize

If an UnknownError warning appears while executing the Set-AuthenticodeSignature command, then this certificate is not trusted, because located in the user’s personal certificate store.

You need to move it to the Trusted Root Certificates (do not forget to periodically check the Windows certificate store for suspicious certs and update trusted root certificates lists):
Move-Item -Path $cert.PSPath -Destination "Cert:\LocalMachine\Root"
Now when verifying the signature of a PS1 file, the Valid status should be returned.

When signing a PowerShell script file, the Set-AuthenticodeSignature cmdlet adds a digital signature block to the end of the PS1 text file:
# SIG # Begin signature block
...........
...........
# SIG # End signature block

The signature block contains the hash of the script, which is encrypted using the private key.
The first time you try to run the script, a warning will appear:
Do you want to run software from this untrusted publisher?
File C:\PS\script.ps1 is published by CN=testPC1 and is not trusted on your system. Only run scripts from trusted publishers.
If you select [A] Always run at the first run of the script, the next time you run the script, signed using this certificate, a warning will no longer appear.

To prevent this warning from appearing, you need to copy the certificate also to the Trusted Publishers certificate authority. Use the Copy-Paste operation in the Certificates console to copy the certificate to the Trusted Publishers -> Certificates.
The signed PowerShell script will now run without displaying untrusted publisher notification.
If the root certificate is untrusted, then when you run the PowerShell script, an error will appear:
A certificate chain processed, but terminated in a root certificate which is not trusted by the trust provider.
What will happen if you change the code of the signed PowerShell script file? The attempt of running it will be blocked with the notification that the contents of the script has been changed.
File xx.ps1 cannot be loaded. The contents of file xx.ps1 might have been changed by an unauthorized user or process, because the hash of the file does not match the hash stored in the digital signature. The script cannot run on the specified system.

Try to verify the signature of the script using the Get-AuthenticodeSignature cmdlet. If the calculated hash doesn’t match the hash in the signature, the message HashMismatch appears.

Thus, any modification of the code of the signed PS1 script will require to re-signing it.
1 comment
Great job detailing this process. I recently began forcing signed only (for security reasons) and your process is the cleanest I have seen.