As a rule, in local and global networks, files are transferred between devices using SMB, FTP or HTTP protocols. The problem of all these protocols is some troubles with resuming the download of the large files, which can become even worse if the network is slow or unreliable. Moreover, when copying files using these protocols, all the available bandwidth between a server and a recipient is used, which may negatively affect the network performance and the operation of other network apps (it is not always possible to configure correct QoS policies at the network equipment). In this article, we’ll consider how to use BITS protocol and PowerShell to copy large files over a slow or unstable network.
- BITS Protocol
- BITS: OS and PowerShell Version Requirements
- How to Download a File over the BITS Protocol using PowerShell?
- Synchronous File Transfer between Computer Using BITS
- Transferring Large Files Over the Network with BITS in Asynchronous Mode
- How to Copy the Directory Contents Using BITS?
- How to Upload File on HTTP Server Using PowerShell and BITS?
BITS Protocol
BITS (Background Intelligent Transfer service) is a Windows service used to transfer files between the systems. You can download and upload files using the BITS protocol. This protocol is used by computers when receiving files from servers when performing automatic Windows updates (including case when downloading updates from a WSUS server), when receiving programs from SCCM distribution points, etc.
Advantages of the BITS Protocol:
- BITS is the intelligent protocol that is able to control the used bandwidth of the communication channel and not to affect the operation of other network apps and services. BITS can use only the free (unallocated) bandwidth and dynamically change the data rate during the transfer (if other applications increase the network usage, BITS client can reduce the data transfer rate over the network);
- File download can proceed in the background mode transparent to the user;
- BITS job in resume mode will automatically continue even if the communication channel between the computer and the client is broken, or after the computer is rebooted;
- You can pause or resume downloading by BITS without losing data;Note. The ability to resume file copying over the network is also available in the robocopy.exe utility, which allows you to resume downloading the file if the connection is lost.
- BITS allows you to manage the priorities of download jobs;
- File transfer between computers occurs on ports 80 (HTTP) or 443 (HTTPS), so you won’t have to open additional ports on firewalls. For example, port 445, which is used when copying files over the SMB protocol (don’t forget that there are many vulnerabilities in old version of the SMB 1.0 protocol);
- A deployed IIS server is not necessarily required on the BITS recipient and server side.
Thus, BITS is the preferable protocol for transferring large files over slow and unstable networks (satellite channel, GPRS connection, etc.).
BITS: OS and PowerShell Version Requirements
BITS protocol appeared in Windows XP, in which bitsadmin.exe utility could be used to manage BITS tasks. The utility is still supported, but is deprecated. To manage BITS jobs, it is preferable to use special PowerShell cmdlets.
To work under this scenario, you need an OS not lower than Windows Vista or Windows Server 2008 and PowerShell 2.0 or newer. Modern versions of Windows 10 and Windows Server 2016/2012 R2 fully support BITS.
BITS support is required on the side of both client and server.
How to Download a File over the BITS Protocol using PowerShell?
Suppose you want to download a large ISO file stored on IIS HTTP server (http://10.1.1.18/erd65_32.iso). It is assumed that anonymous access is allowed to this URL (later we’ll consider access to the URL with authentication).
First of all, import BITS module in your PowerShell session:
Import-Module BitsTransfer
After the module is imported, the list of all available commands can be displayed as follows:
get-command *-BITS*
As you can see, there are 8 cmdlets available:
- Add-BitsFile
- Complete-BitsTransfer
- Get-BitsTransfer
- Remove-BitsTransfer
- Resume-BitsTransfer
- Set-BitsTransfer
- Start-BitsTransfer
- Suspend-BitsTransfer
Synchronous File Transfer between Computer Using BITS
The Start-BitsTransfer cmdlet allows you to download files via HTTP(s) (like the Invoke-WebRequest cmdlet) as well as from network shared folders (via SMB). To download a file from the specified URL using the BITS protocol and save it to the local directory C:\Temp, use the command:
Start-BitsTransfer –source http://10.1.1.18/erd65_32.iso -destination c:\temp
The message “This is a file transfer that uses the Background Intelligent Transfer service (BITS)” means that the specified file is being downloaded using BITS.
In this case the cmdlet has started the download the ISO file in a synchronous mode. The download is similar to a usual process of file copying through File Explorer or using the Copy-Item cmdlet. A progress bar is displayed on the screen, which showing the download status. If a computer is restarted, the download won’t be resumed (you will need to download the entire file again).
Transferring Large Files Over the Network with BITS in Asynchronous Mode
BITS download can be started in the asynchronous mode as well. To do it, add –asynchronous parameter to the command shown above. In this mode, if something happens (server or client reboot, interruption of the communication channel, etc.), the BITS job will automatically resume after the source is restored and the file download will be continue from the moment the connection is interrupted:
Start-BitsTransfer -source http://10.1.1.18/erd65_32.iso -destination c:\temp -asynchronous
Start-BitsTransfer -source http://10.1.1.18/erd65_32.iso -destination c:\temp -asynchronous -Priority low
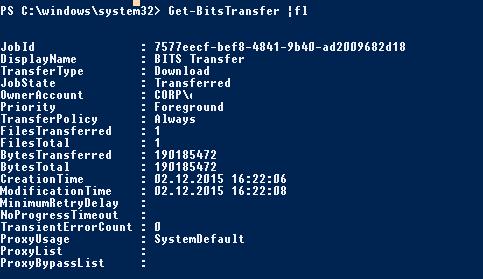
The asynchronous BITS task runs in the background, and the file download process is not displayed on the screen. The status of the BITS job can be obtained from the PowerShell console using the Get-BitsTransfer command:
Get-BitsTransfer | fl
The command returns the transfer status (in this case the transfer is over: Transferred), the info about the number of bytes transferred, the total file size, the time the file has been created and the time the task is completed.
You can view the status of all BITS tasks running on the computer in tableform:
Get-BitsTransfer | select DisplayName, BytesTotal, BytesTransferred, JobState | Format-Table -AutoSize
When using the asynchronous transfer mode, a temporary file with TMP extension is created (by default, it is hidden in Windows Explorer). To convert it into the source file (which is stored on the source server), run the command Complete-BitsTransfer:
Get-BitsTransfer | Complete-BitsTransfer
The BITS download task is then considered as completed and being removed from the list of jobs.
You can upload a local file to a network shared folder on a remote Windows file server. To do this, use the following command (for convenience, you can specify the name of the copy job):
Start-BitsTransfer -Source C:\iso\w10_1809.iso -Destination \\manch-fs1\iso -Asynchronous -DisplayName CopyISOtoMan
To temporarily suspend a BITS task, run:
Get-BitsTransfer -Name CopyISOtoMan | Suspend-BitsTransfer
To resume the BITS job, use the Resume-BitsTransfer cmdlet:
Get-BitsTransfer -Name CopyISOtoMan | Resume-BitsTransfer -Asynchronous
You can add additional files to the BITS task using the Add-BitsFile cmdlet:
Get-BitsTransfer -Name CopyISOtoMan | Add-BitsFile -Source C:\iso\w10msu\* -Destination \\manch-fs1\iso -Asynchronous
To delete all BITS download tasks on the computer (including those started by other users), run the following command:
Get-BitsTransfer -Allusers|Remove-BitsTransfer
You cannot cancel BITS jobs running under System account (error 0x80070005 “Unable to cancel job”). To cancel such a task, you need to execute the Remove-BitsTransfer command under SYSTEM.
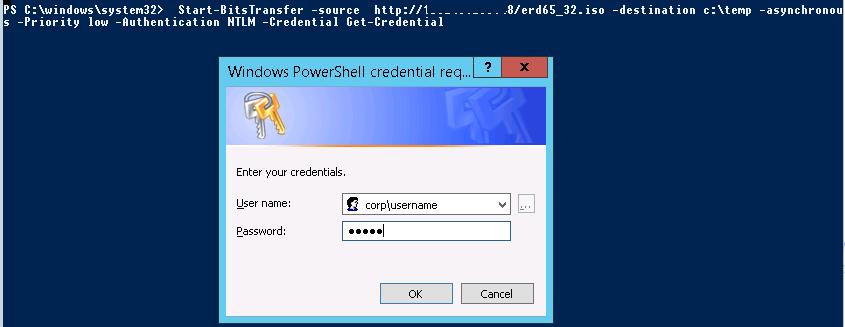
If the server, where the file is stored, requires user authentication, the following command will allow to show a window to specify credentials to access the resource:
Start-BitsTransfer -source http://10.1.1.18/erd65_32.iso -destination c:\temp -asynchronous -Priority low -Authentication NTLM -Credential Get-Credential
To make it easier to track the results of a BITS task, you can use a simple script, which allows to track the task progress and once every few seconds displays the download percentage on the screen. After the download is over, the script automatically converts the TMP file into the source format:
Import-Module BitsTransfer
 $bitsjob = Start-BitsTransfer -Source http://10.1.1.18/erd65_32.iso -Destination c:\temp -Asynchronous
 while( ($bitsjob.JobState.ToString() -eq 'Transferring') -or ($bitsjob.JobState.ToString() -eq 'Connecting') )
 {
 Write-host $bitsjob.JobState.ToString()
 $Proc = ($bitsjob.BytesTransferred / $bitsjob.BytesTotal) * 100
 Write-Host $Proc “%”
 Sleep 3
 }
 Complete-BitsTransfer -BitsJob $bitsjob
How to Copy the Directory Contents Using BITS?
As we already mentioned, BITS doesn’t require a Web-server, and it means that we can copy files directly from other Windows computers or network shared folders:
Start-BitsTransfer -Source \\lon-rep01\os\RHEL4.8-x86_64-AS-DVD.iso -Destination c:\temp -Asynchronous
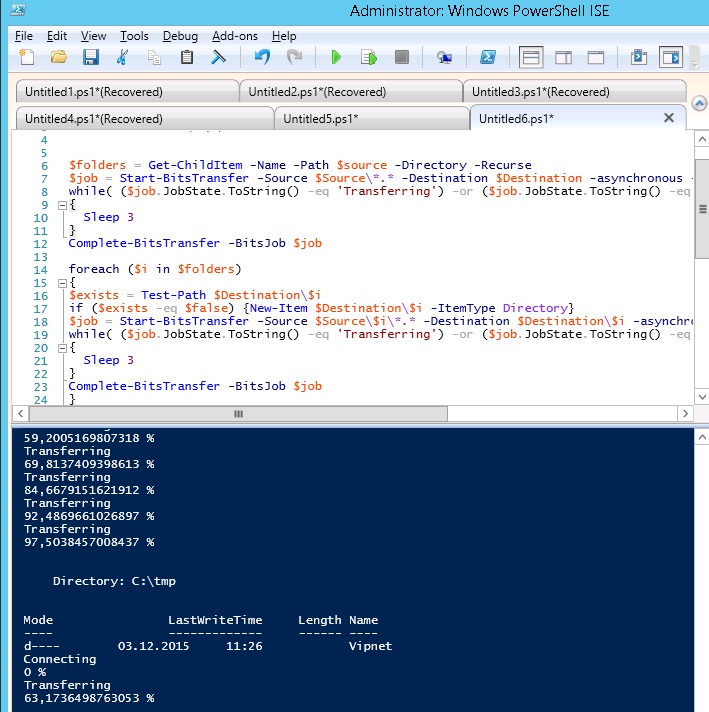
BitsTransfer cannot recursively copy all files and folders from a specific folder or files used by other programs. In order to copy all files and subdirectories from the specified network shared folder, use this script (you can first check whether the target directory exists and create it):
Import-Module BitsTransfer
 $Source="\\lond-rep01\share\"
 $Destination="c:\tmp\"
 if ( -Not (Test-Path $Destination))
 {
 $null = New-Item -Path $Destination -ItemType Directory
 }
 $folders = Get-ChildItem -Name -Path $source -Directory -Recurse
 $bitsjob = Start-BitsTransfer -Source $Source\*.* -Destination $Destination -asynchronous -Priority low
 while( ($bitsjob.JobState.ToString() -eq 'Transferring') -or ($bitsjob.JobState.ToString() -eq 'Connecting') )
 {
 Sleep 4
 }
 Complete-BitsTransfer -BitsJob $bitsjob
 foreach ($i in $folders)
 {
 $exists = Test-Path $Destination\$i
 if ($exists -eq $false) {New-Item $Destination\$i -ItemType Directory}
 $bitsjob = Start-BitsTransfer -Source $Source\$i\*.* -Destination $Destination\$i -asynchronous -Priority low
 while( ($bitsjob.JobState.ToString() -eq 'Transferring') -or ($bitsjob.JobState.ToString() -eq 'Connecting') )
 {
 Sleep 4
 }
 Complete-BitsTransfer -BitsJob $bitsjob
 }
How to Upload File on HTTP Server Using PowerShell and BITS?
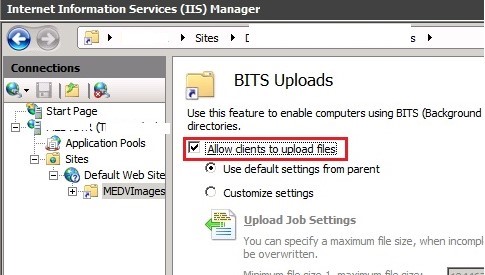
With BITS, you can not only download a file from an HTTP server, but also upload it to a remote web server. To do this, the IIS web server with the Bits Server Extension component must be installed on the target server. In the settings of the IIS virtual directory in the Bits Uploads section, you need to enable the “Allow clients to upload files” option.
If you use anonymous authentication, you must allow anonymous users to write to the directory on the NTFS permissions level. If file uploads are performed under authorized users, they need to grant RW permissions to the upload folder.
To upload a file to an HTTP server using the BITS protocol, run the following command:
Start-bits –source c:\iso\winsrv2016.iso -destination http://10.1.1.18/MEDVImages/winsrv2016.iso –Transfertype Upload
Thus, using BITS features is a great alternative to the common file copying over the network using SMB protocol. BITS file transfer task is performed despite of connection disruptions or computer restarts, and doesn’t occupy the bandwidth much without interfering with other apps. The BITS protocol can be the optimal solution for transferring large ISO image and virtual machine files (vmdk, vhdx) over a WAN network.


2 comments
do you know how to have bits ignored self signed certs ?
One item that you don’t mention, and that my Google-Fu is not strong enough to find, is does BitsTransfer verify the remote file when you’re copying ‘to’ a network/remote location?.. alongside that question, would I be correct to presume that if it did, it would effectively ‘double’ the data transfer between the source & destination?