Dynamic resizing of virtual machine hard disks is available starting with Hyper-V in Windows Server 2012 R2. Online VHDX Resize feature allows you to increase or shrink the size of the vhdx file of a virtual machine online (without stopping the VM). In this article, we will look at how to extend or reduce (shrink) the size of a virtual machine hard disk in Hyper-V running on Windows 10 or Windows Server 2016 (instructions apply to all supported versions of Hyper-V, including free Hyper-V Server).
Key features and limitations of Online VHDX Resize in Hyper-V:
- You can resize any type of Hyper-V virtual disk: fixed, dynamic, and differential;
- You can resize the VHDX disk (including the system drive of the guest OS) on the fly. You don’t need to stop the VM;Only VHDXs can be dynamically resized. VHDs are not supported and have to be converted into the VHDX format.
- VHDX disk must be connected to the VM through a virtual SCSI controller (online extension of disks on the IDE controller is not supported, such a VM will have to be turned off to change the disk size);
- Online VHDX Resize works both on the first and the second generation of virtual machines Hyper-V;
- Both Windows and Linux can act as a guest OS;
- Both extension and shrinking of virtual disks are supported;
- You can resize vhdx disk from Hyper-V graphical console, PowerShell or Windows Admin Center;
- Resizing of shared VHDX (AVHDX) disks used in clusters is not supported;
- You cannot change the size of the virtual disk for which the snapshot was created (for example, during a backup).
Expanding VM Hard Disk in Hyper-V
You can increase the size of the virtual VHDX disk using the Hyper-V Manager console.
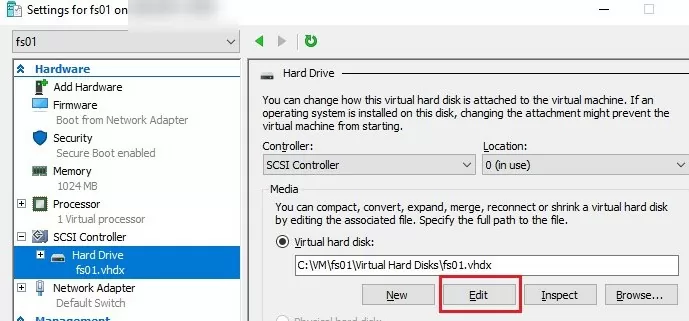
- Select the virtual machine in the Hyper-V virtual machine manager, go to VM Settings -> expand SCSI Controller;
- Choose the virtual disk and click the Edit button;
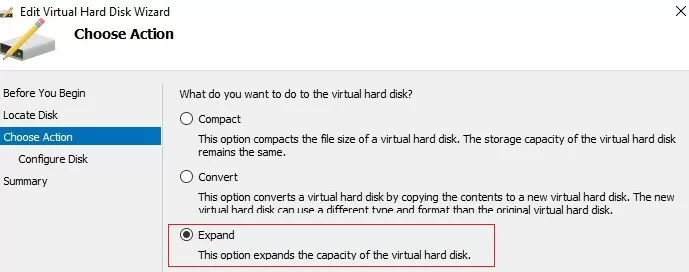
- In the appearing Edit Virtual Hard Disk wizard choose Expand;
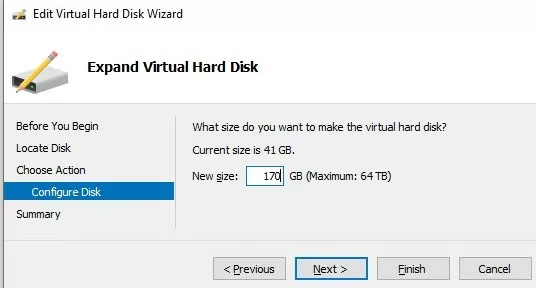
- Specify the new size of the virtual hard disk (in our example we’ll expand the disk size to 170 GB);
- Go to the console of the guest OS, which disk was extended. Let’s take a look at how to increase a system partition in a Windows guest OS. Open the Disk Manager console. As you can see, extra 43 GB of unallocated space appeared on the disk;
- Right-click the partition you want to extend and choose Extend Volume (you can only expand the volume to the left of the unallocated area). Specify how much you want to increase the current volume size;
- After completing the Extend procedure, the volume size will be increased.In a guest Linux OS, you can expand the disk using the parted tool.
How to Shrink the Size of Hyper-V Virtual Disk (VHDX)?
Now let’s look at how to reduce the size of a virtual vhdx disk on Hyper-V.
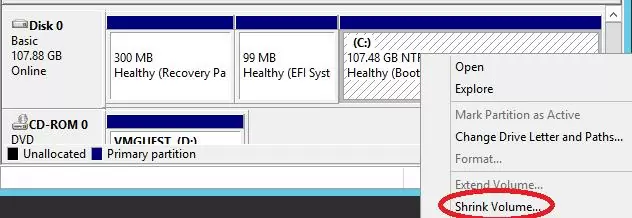
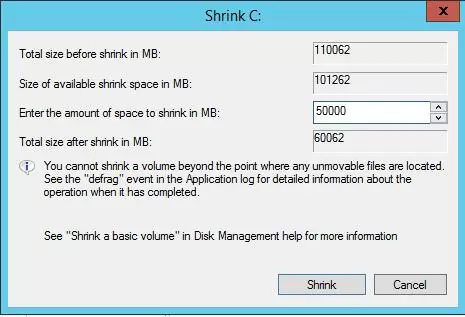
- Before shrinking a virtual disk from the Hyper-V console, it is necessary to reduce the size of the logical partition on the disk inside the guest OS. Free up some space and convert it to the unallocated volume. To do it, open the Disk Manager in the guest OS, select a volume and click Shrink Volume;Note. Shrink Volume option becomes available only if there is some free space on the partition.
- Specify the amount of space to shrink the partition by (in our example we specified 50GB);
- After reducing the size of the partition in the guest OS, you need to open the Hyper-V console and go to the virtual disk settings. Press the Edit button;
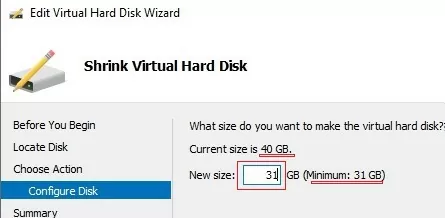
- In the Edit Virtual Hard Disk wizard, select Shrink, then specify a new size for the vhdx file. Please note that you cannot make the disk smaller than the data on it (check the Minimum value). In our case, you can reduce the disk size from 40 to 31 GB;
- Done.
Resizing Virtual Hard Disk Files in Hyper-V with PowerShell
You can resize the VHDX disk on Hyper-V host using PowerShell. To do this, use the Resize-VHD cmdlet (not to be confused with Resize-VirtualDisk cmdlet, which belongs to the built-in Windows disk management cmdlets).
First, you need to get the full path to the VHDX disk of the virtual machine:
Get-VM -VMName fs01 | Select-Object VMId | Get-VHD
These cmdlets also returns the actual size of the VHDX file on the storage (FileSize) and the maximum size that it can take (Size). MinimumSize is the minimum VHDX disk size to which a virtual disk file can be reduced.
In order to increase the size of the VHDX disk, you need to specify its new size:
Resize-VHD -Path 'C:\VM\fs01\VHD\fs01.vhdx' -SizeBytes 50Gb
Resize-VHD : Failed to resize the virtual disk.You just need to resize the partition in the guest OS.
You can expand a disk on Windows remotely using PowerShell Remoting. Connect to the remote VM using the Invoke-Command or Enter-PSSession cmdlet (over the network or via Hyper-V PowerShell Direct):
Enter-PSSession -ComputerName fs01
You need to get information on how much you can expand the partition and expand it to the maximum available size:
$MaxSize = (Get-PartitionSupportedSize -DriveLetter C).SizeMax
 Resize-Partition -DriveLetter L -Size $MaxSize
If you need to shrink the size of the virtual disk to the smallest possible size, run:
Resize-VHD -Path 'C:\VM\fs01\VHD\fs01.vhdx' -ToMinimumSize
This command will reduce the maximum VHDX file size by 6 GB.





1 comment
How to shrink vhdx with IDE controller ?