Windows OS Hub
  • Windows Server
    • Windows Server 2022
    • Windows Server 2019
    • Windows Server 2016
    • Windows Server 2012 R2
    • Windows Server 2008 R2
    • SCCM
  • Active Directory
    • Active Directory Domain Services (AD DS)
    • Group Policies
  • Windows Clients
    • Windows 11
    • Windows 10
    • Windows 8
    • Windows 7
    • Windows XP
    • MS Office
    • Outlook
  • Virtualization
    • VMWare
    • Hyper-V
    • KVM
  • PowerShell
  • Exchange
  • Cloud
    • Azure
    • Microsoft 365
    • Office 365
  • Linux
    • CentOS
    • RHEL
    • Ubuntu
  • Home
  • About

Windows OS Hub

  • Windows Server
    • Windows Server 2022
    • Windows Server 2019
    • Windows Server 2016
    • Windows Server 2012 R2
    • Windows Server 2008 R2
    • SCCM
  • Active Directory
    • Active Directory Domain Services (AD DS)
    • Group Policies
  • Windows Clients
    • Windows 11
    • Windows 10
    • Windows 8
    • Windows 7
    • Windows XP
    • MS Office
    • Outlook
  • Virtualization
    • VMWare
    • Hyper-V
    • KVM
  • PowerShell
  • Exchange
  • Cloud
    • Azure
    • Microsoft 365
    • Office 365
  • Linux
    • CentOS
    • RHEL
    • Ubuntu

 Windows OS Hub / Windows 10 / Virtual Secure Mode (VSM) in Windows 10 Enterprise

June 7, 2022 Windows 10

Virtual Secure Mode (VSM) in Windows 10 Enterprise

In Windows 10 Enterprise (only in this edition), a new Hyper-V component has appeared – Virtual Secure Mode (VSM). VSM is a protected container (virtual machine) run on a hypervisor and separated from host Windows 10 host and its kernel. Crucial from the security point of view system components run inside this protected virtual container. No third-party code can be executed in the VSM, and code integrity is constantly checked for modification. This architecture allows to protect data in the VSM, even if the kernel of the host Widows 10 is compromised, because even the kernel cannot access the VSM directly.

VSM container cannot be connected to the network and nobody can get administrative privileges in it. Encryption keys, user authentication data and other crucial information from the compromise point of view can be stored in Virtual Secure Mode container. Thus, a hacker won’t be able to penetrate the corporate structure using locally cached data of the domain user accounts.

Virtual Secure Mode (VSM) in Windows 10

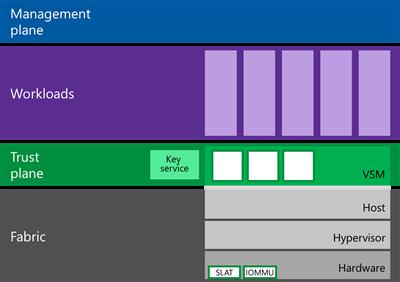
The following system components can work inside the VSM:

  1. LSASS (Local Security Subsystem Service) is a component responsible for authentication and isolation of local users. (Thus, the system is protected from the attacks of “pass the hash” type and such tools, like mimikatz link.) It means that the passwords (and/or hashes) of user registered in the system cannot become available even for a user with local administrator privileges.
  2. Virtual TPM (vTPM) is a synthetic TPM device for guest machines necessary for encryption of disk contents
  3. The system for monitoring the OS code integrity protects the code against modification
Note. Such security technologies, like Shielded Virtual Machines and Device Guard also work in VSM. A host and a guest OSs can also interact with Virtual Secure Mode container using API interfaces.

To use VSM, the environment has to meet the following hardware requirements:

  • UEFI, Secure Boot and Trusted Platform Module (TPM) support for secure key storage
  • Hardware virtualization support (VT-x, AMD-V or later)

How to Enable Virtual Secure Mode (VSM) in Windows 10

Let’s see how to enable Virtual Secure Mode Windows 10.

  • UEFI Secure Boot must be enabled.
  • Windows 10 has to be included in the domain. (VSM protects only domain user accounts, not local ones.)
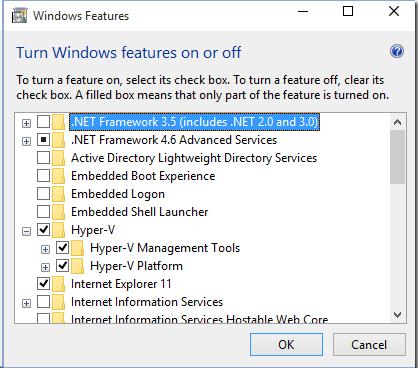
  • Hyper-V role has to be installed in Windows 10. (In our case, we had to install Hyper-V Platform first, and then we installed Hyper-V Management Tools)Hyper-V role  on  Windows 10
  • Virtual Secure Mode (VSM) has to be enabled in a special policy in the Group Policy Editor (gpedit.msc): Computer Configuration -> Administrative templates -> System -> Device Guard -> Turn on Virtualization Based Security. Enable this policy and select Secure Boot option in Select Platform security level. Also check Enable Credential Guard (LSA isolation) here. Turn on Virtualization Based Security
  • And the last thing to do is to configure BCD to start Windows 10 in the VSM:
    bcdedit /set vsmlaunchtype auto
  • Restart your computer

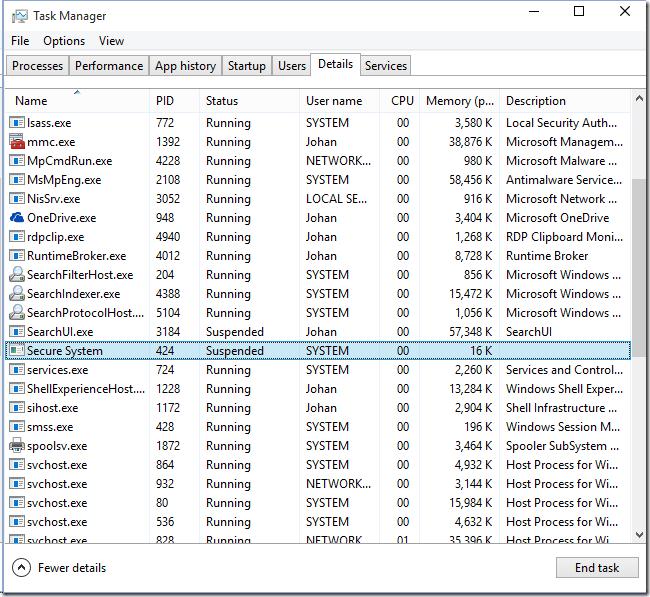
How to Make Sure That the VSM Is On

You can make sure that the VSM is active if Secure System process is present in the Task Manager.

Secure System process in Task Manager

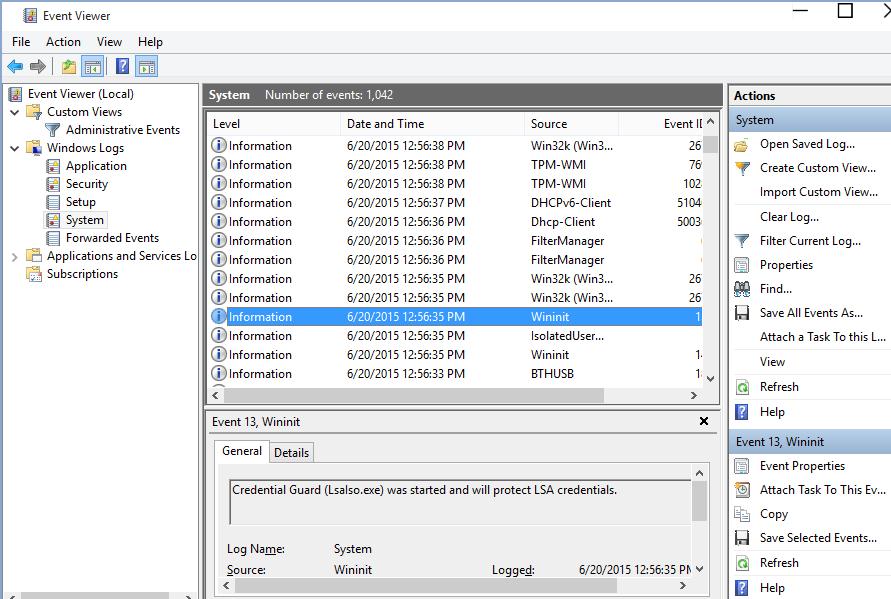
Or if there is the event “Credential Guard (Lsalso.exe) was started and will protect LSA credential” in the system log.

Credential Guard (Lsalso.exe) was started and will protect LSA credential

How to Test VSM Security

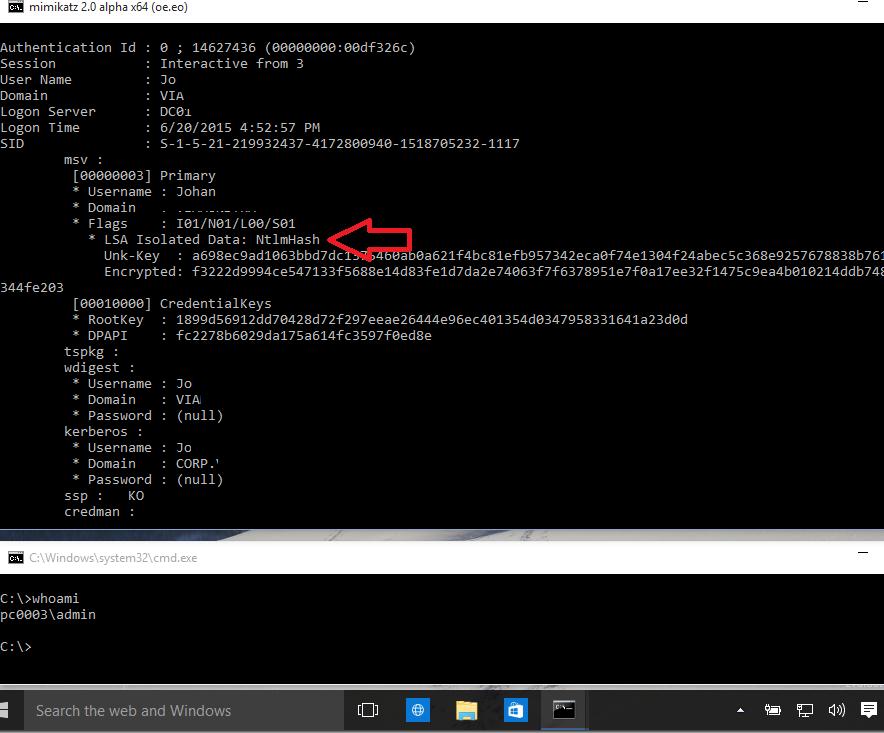
Log in with a domain account to the machines with the VSM enabled and run the following mimikatz command with the local administrator privileges:

mimikatz.exe privilege::debug sekurlsa::logonpasswords exit

We can see that LSA is running in an isolated environment and user password hashes cannot be obtained.

mimikatz sekurlsa logonpasswords

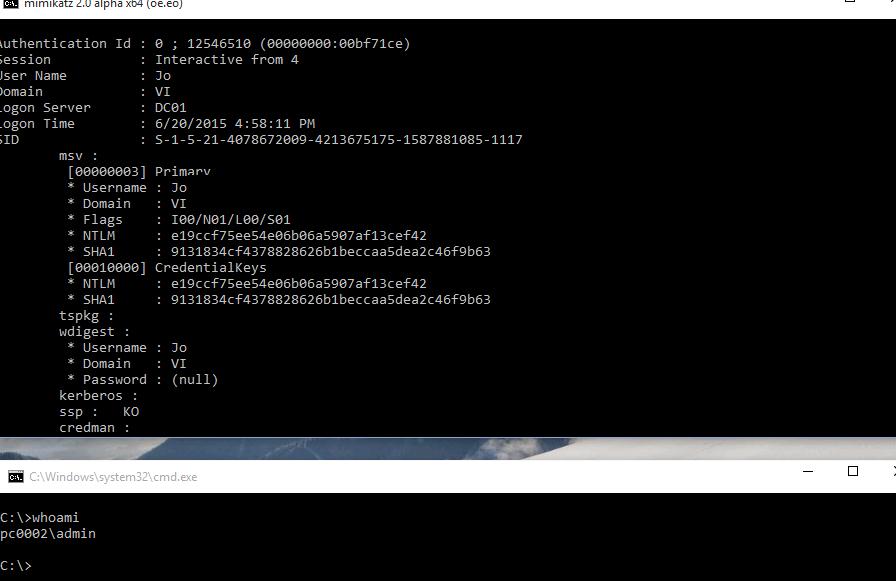
If you do the same on a machine with the VSM disabled, we can get NTLM hash of a user password, which can be used in pass-the-hash attacks.

mimikatz get credentials  keys

Ref: Enabling Virtual Secure Mode (VSM) in Windows 10 Enterprise Build 10130

2 comments
0
Facebook Twitter Google + Pinterest
previous post
How Windows Determines That the File Has Been Downloaded from the Internet
next post
Printer Pooling: How to Configure a Printer Pool in Windows Server 2012 R2

Related Reading

Zabbix: How to Get Data from PowerShell Scripts

October 27, 2023

Tracking Printer Usage with Windows Event Viewer Logs

October 19, 2023

How to Use Ansible to Manage Windows Machines

September 25, 2023

Installing Language Pack in Windows 10/11 with PowerShell

September 15, 2023

How to View and Change BIOS (UEFI) Settings...

September 13, 2023

2 comments

Johan Arwidmark October 16, 2015 - 2:08 am

Nice article,
But I did notice you “borrowed” some screenshots from me without asking…
/ Johan Arwidmark

Reply
Max October 28, 2015 - 11:51 am

Hi, John.

I added a link on your post

Reply

Leave a Comment Cancel Reply

Categories

  • Active Directory
  • Group Policies
  • Exchange Server
  • Microsoft 365
  • Azure
  • Windows 11
  • Windows 10
  • Windows Server 2022
  • Windows Server 2019
  • Windows Server 2016
  • PowerShell
  • VMWare
  • Hyper-V
  • Linux
  • MS Office

Recent Posts

  • Zabbix: How to Get Data from PowerShell Scripts

    October 27, 2023
  • Tracking Printer Usage with Windows Event Viewer Logs

    October 19, 2023
  • PowerShell: Configure Certificate-Based Authentication for Exchange Online (Azure)

    October 15, 2023
  • Reset Root Password in VMware ESXi

    October 12, 2023
  • How to Query and Change Teams User Presence Status with PowerShell

    October 8, 2023
  • How to Increase Size of Disk Partition in Ubuntu

    October 5, 2023
  • How to Use Ansible to Manage Windows Machines

    September 25, 2023
  • Installing Language Pack in Windows 10/11 with PowerShell

    September 15, 2023
  • Configure Email Forwarding for Mailbox on Exchange Server/Microsoft 365

    September 14, 2023
  • How to View and Change BIOS (UEFI) Settings with PowerShell

    September 13, 2023

Follow us

  • Facebook
  • Twitter
  • Telegram
Popular Posts
  • Unable to Connect Windows 10 Shared Printer to Windows XP
  • How to Install and Configure TFTP Server and Client on Windows
  • AutoRedial for VPN Connections in Windows 8/10/2012
Footer Logo

@2014 - 2023 - Windows OS Hub. All about operating systems for sysadmins


Back To Top